
March 31, 2026
Why Your Social Media Posts Stay Hidden
Ever wonder why your business posts only seem to get a few “sympathy likes” from the same people? You are doing everything the gurus tell you to do. You are posting reels, using trending audio, and staying “consistent,” but the result is almost always total silence. It is frustrating, and enough to make you want to toss your phone into the deep end of a lake. You get the silent treatment because social media platforms act like moody bouncers at a crowded club. They keep the velvet rope tight and only let a tiny fraction of your audience see you through a crack in the door. This is more than just annoying. It is a business trap. When your messages are kept from your actual market, you have no way of knowing if your message is actually what they want to hear.
Reach Your Ideal Audience for the Price of a Coffee
This is where the “Coffee-a-Day” method comes in. The first step is to slip a tiny “tip” to the bouncer, as little as $1 a day. This lets you in and gets your posts in front of the right crowd. While there is a lot more to the full Coffee-a-Day system, this guide focuses on the specific mechanics of one vital piece: how to “boost” your posts the right way on Facebook and Instagram.
Have you ever noticed that bright blue “Boost Post” button on your posts? It is sitting right there, practically begging you to click it. That button is Meta’s way of letting you turn a regular post into a simple ad. Most people ignore it because they think it is a trap to take their money. Plus, if you have ever actually clicked it, the options that pop up can look pretty overwhelming.
But it is actually the door to the club we talked about, and it’s a lot easier than it looks. This guide breaks it all down and shows you exactly how to use it, step by step.
How To Set Up Boosts for Facebook and Instagram, the Coffee-a-Day Way
Step 1: Open the Boost Window
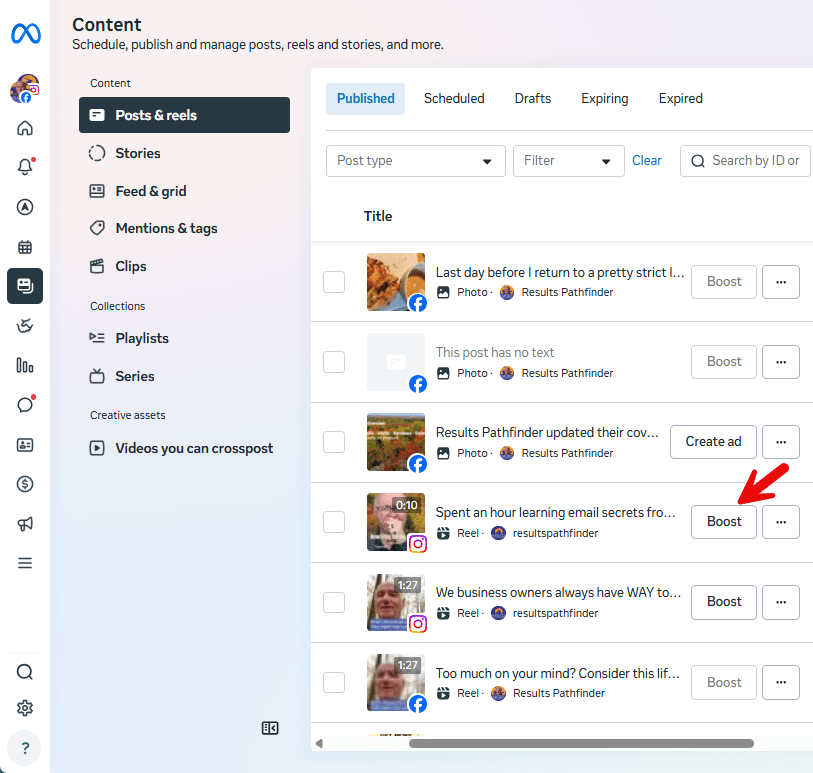
On your screen, look for the Boost button beside your post. Different layouts may look slightly different, but the button is usually easy to spot.
Not all posts can be boosted, so if you don’t see the button, or it’s greyed out so you can’t click on it, or you see a different button that says Create Ad, that’s completely normal and we’ll talk about why next.
Why You Can’t Always Boost a Post
If you don’t see the Boost button, or it’s greyed out, or you see “Create Ad” instead, you’re not doing anything wrong. Some posts just aren’t eligible for boosting, and this happens to almost everyone.
Posts with copyrighted music often can’t be boosted.
Anything you shared from another Page or profile also won’t work — Meta only lets you boost content you created yourself.
Certain formats, like polls, events, or some multi-image posts, aren’t supported either.
You may also see a Create Ad button instead of Boost. Don’t click it — that takes you into Ads Manager, which is much more complicated than we need for the Coffee-a-Day way.
Finally, boosting can be blocked because of a Page setting, a temporary glitch, or an account issue. None of that means you made a mistake — it’s just Meta being Meta.
If this happens to you, don’t stress. Just choose another post to boost and keep going.
Step 2: Choose a Goal For The Boost
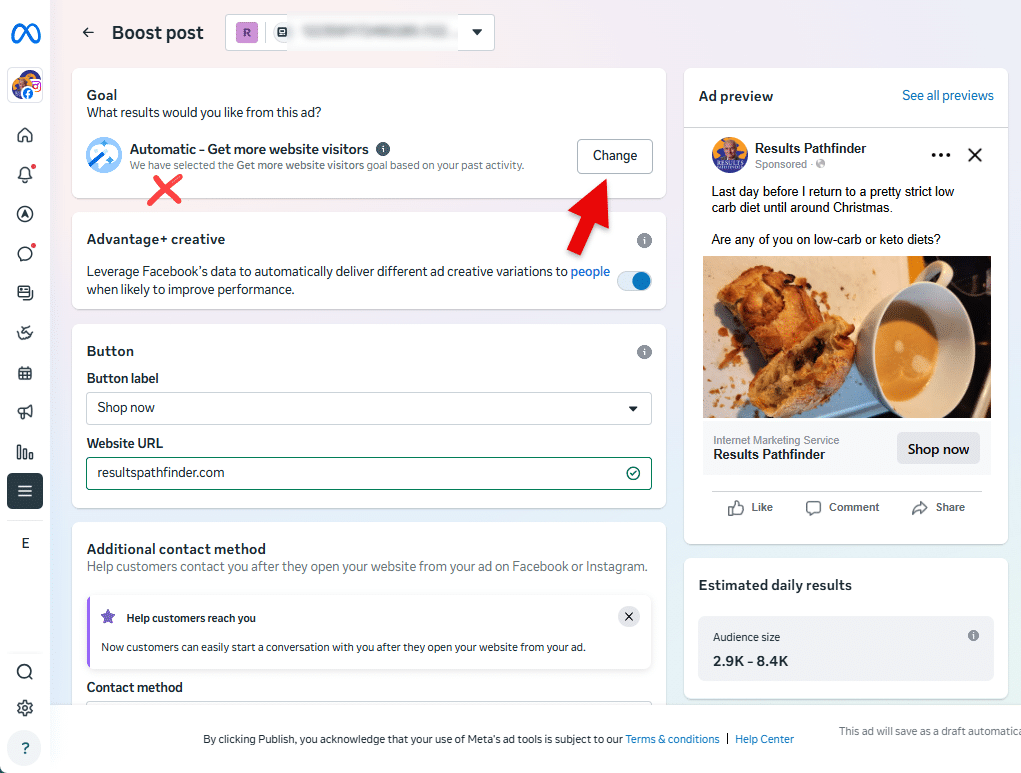
I’m showing a Facebook example here — Instagram is similar. The first thing we choose when boosting a post is a goal. A goal is simply the result you want Meta to aim for. We want to pick a goal that gets our ad shown the most for the least cost, so we get the most feedback for our Coffee-a-Day test. You may see an option called Automatic, but don’t use that. It gives Meta too much control and doesn’t help us learn what’s working. As you change goals, you may notice the estimated results on the right side changing — this is normal.

If you see a See More button, tap it — Meta sometimes hides the best options behind that.
Choose “Get more engagement” when it’s available. It will show your ad to the most people for the least amount of money, and this is what we want to do when we start testing a post using Coffee-a-Day.
If you’re boosting a Reel, you probably won’t see Engagement, so choose “Get More Video Views” instead.
With Instagram, if you don’t see Engagement, try Profile Visits or Reach.
If your screen looks different, check the small label under each goal. If the label says Engagement, choose one of those.
Step 3: Don’t Use the Automatic “Ad Text Variations”
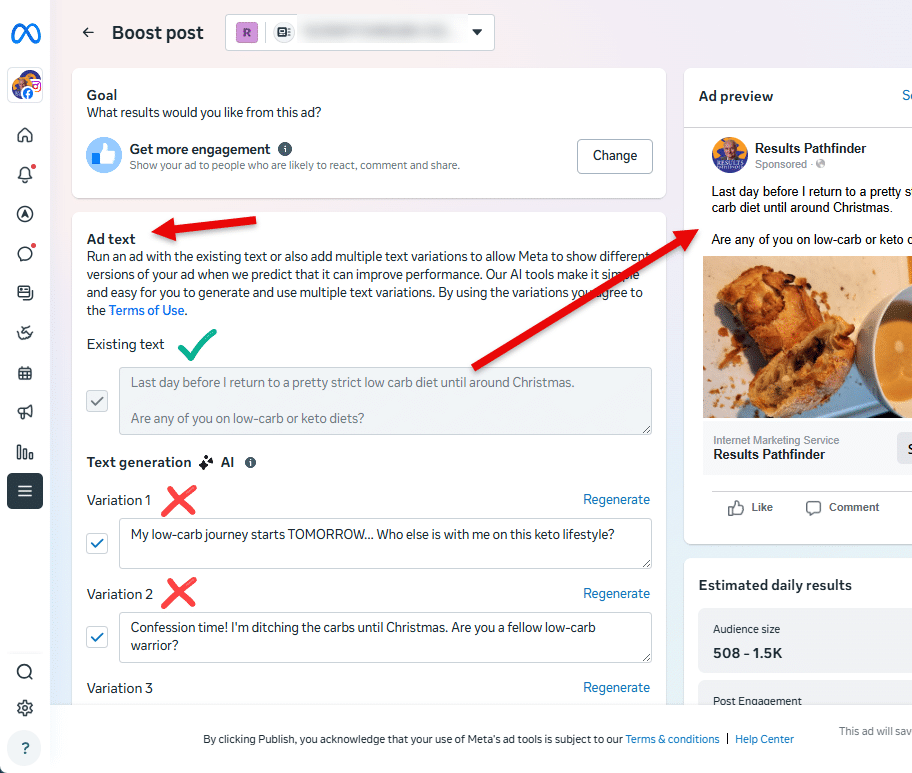
After you choose your goal, Meta may show you different “ad text” options.
This is just Meta trying to be helpful by automatically creating extra versions of the text from your post in order to test which one works best.
The problem is that every new variation splits your tiny budget into even smaller pieces, which makes your results weaker and harder to learn from. For Coffee-a-Day, we want to keep your test clean and simple.
So for now, turn off (uncheck) all the suggested variations and keep only your original text. Later, when you’re using bigger budgets or running more advanced tests, this might be worth exploring — but not yet.
Step 4: Don’t Use “Advantage+ creative”

Next, you may see a section called Advantage+ Creative. This is Meta offering to automatically create different versions of your ad — things like adjusting colors, cropping your image, or changing the look of your text.
These features are sometimes useful with bigger budgets, but for Coffee-a-Day they only split your small budget into even smaller pieces, which makes your results less reliable and harder to understand.
For now, simply turn the Advantage+ Creative toggle off, and keep your ad exactly the way you created it.
Step 5: Including a Button On The Boosted Post
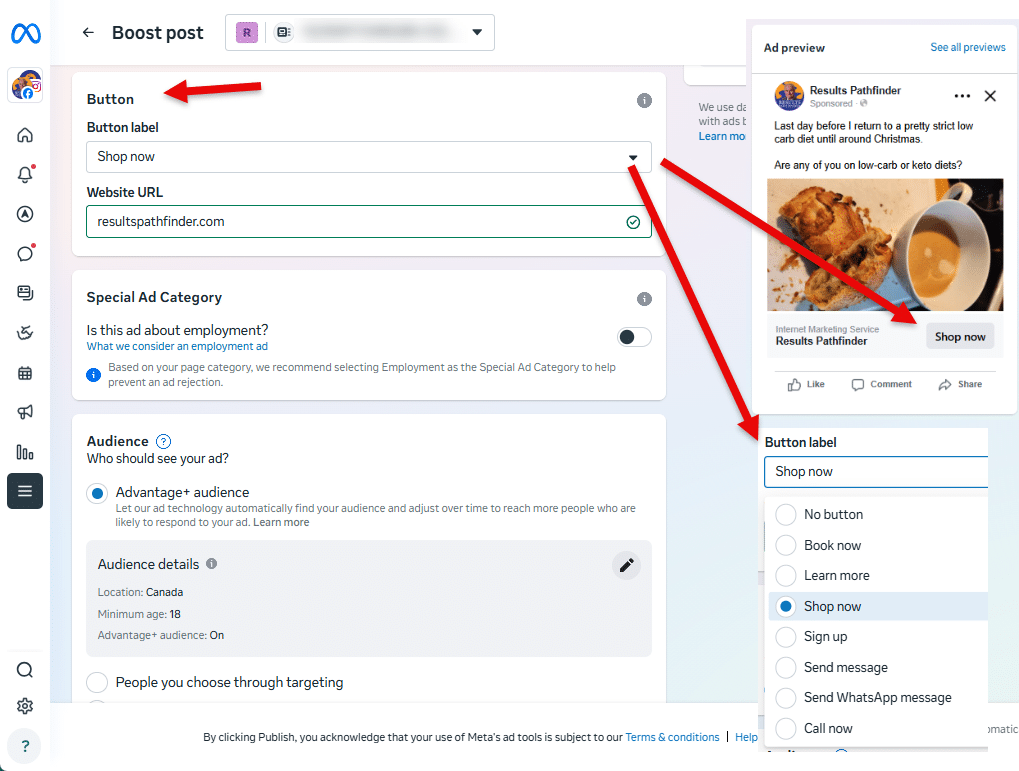
Depending on the goal you chose for the boost, you may see an option to add a button to your boosted post.
A button can make sense if it naturally fits the post you’re boosting. For example, if your post mentions booking, calling, or visiting your website, adding a button might feel helpful.
If you choose a button, look through the list of labels and select one that truly matches what the post is about.
Depending on the button you pick, Meta may also ask for a website link, phone number, or WhatsApp contact for the button. Just fill in whatever makes sense.
If you’re unsure — or if adding a button feels out of place for the post — it’s perfectly fine to choose No Button and keep things simple.
Step 6: Special Ad Categories
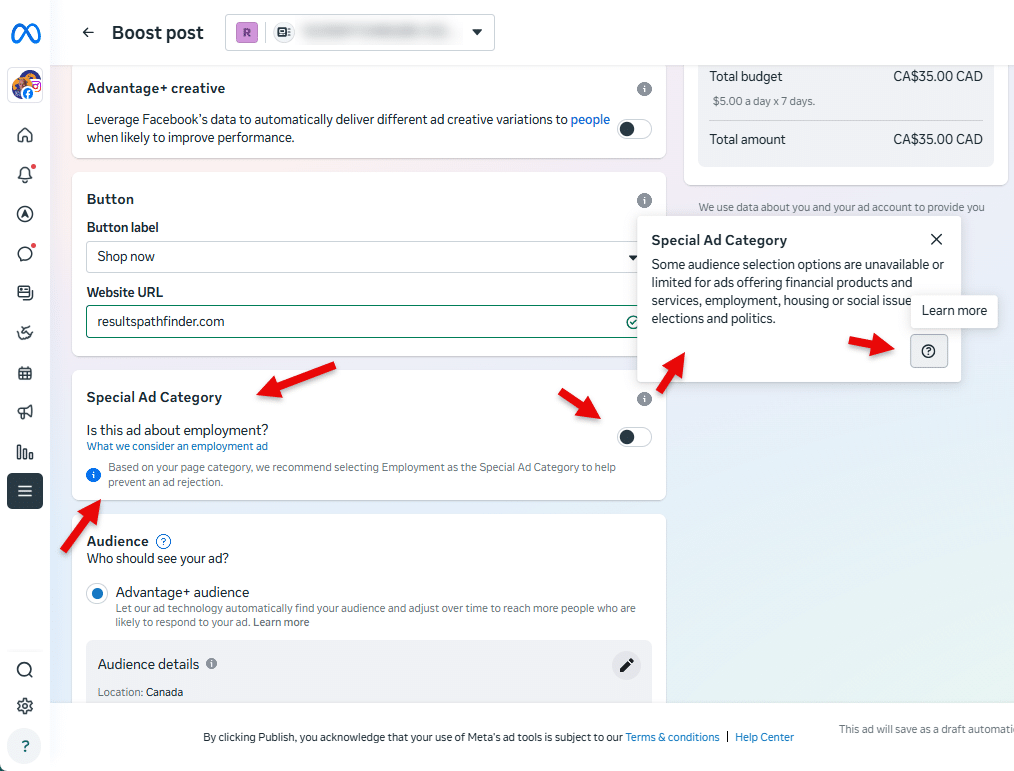
Meta may ask whether your boosted post belongs to a “Special Ad Category.”
These categories apply to sensitive areas like housing, jobs, credit, or political content, where Meta limits targeting to protect people from unfair advertising.
For most small businesses, this won’t apply. If your post is about your regular services, a customer story, a testimonial, or anything general, you can simply select None and continue.
If you’re unsure, look for the small “i” info icon beside this section. Hovering over it gives a short explanation, and you can also click the Learn More button for a longer description. This can help you confirm whether your business falls into one of these categories.
Meta may also recommend a category automatically — but read it carefully. Sometimes the recommendation is completely wrong and has nothing to do with your business. If it doesn’t make sense, you can safely ignore it.
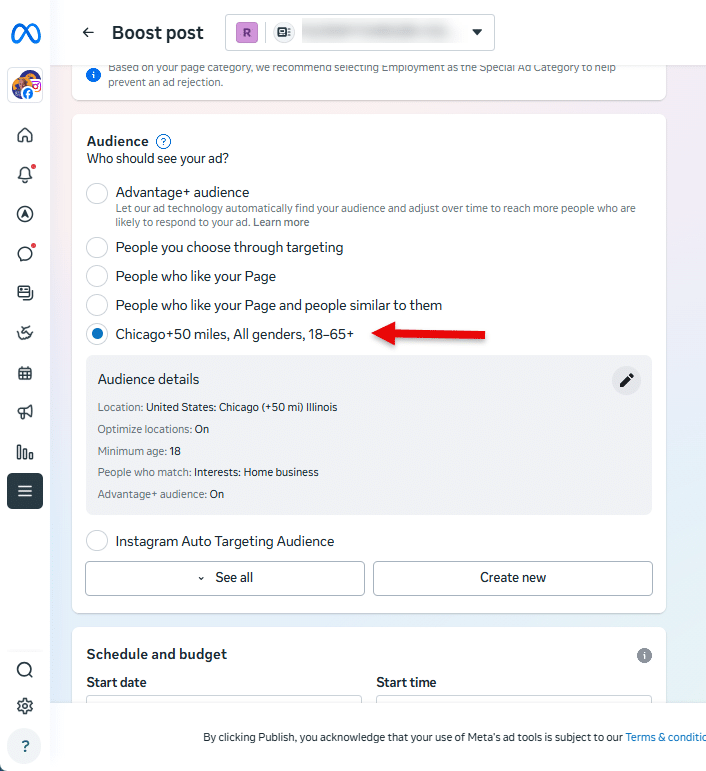
Step 7: Create a New “Audience”
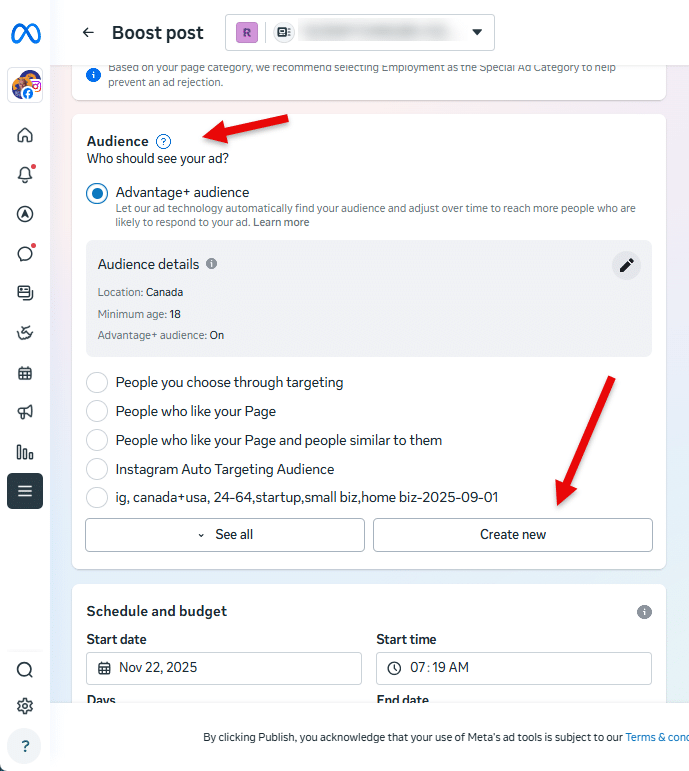
Your audience is simply the group of people Meta will show your ad to. For Coffee-a-Day testing, we want to keep this very simple and consistent.
When you get to this step, you’ll see a few options. Instead of using the default audience, click Create New. This lets you set up an audience that you can save and reuse for all your future Coffee-a-Day tests.
Using the same audience each time keeps your results consistent — that way, the only thing changing between tests is the post itself, which is exactly what we want at this stage.
Step 7A: Audience Setup: Name Your Audience
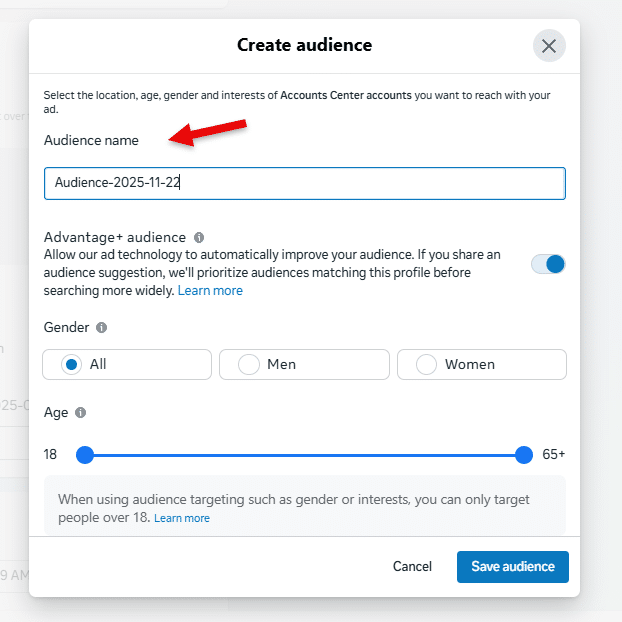
Now you’ll be asked to name the audience you’re creating. This name is just for you, it won’t be shown to anyone else.
Use a name that quickly tells you who is in the audience. For example, you might call it “USA, Women, 30–60” or “Chicago, 18–25.” The exact format doesn’t matter as long as you’ll recognize it later.
You’ll be reusing this audience for all or many of your Coffee-a-Day tests, so choose a name that makes sense to you and is easy to spot in your list.
Step 7B: Audience Setup: Don’t Use Avantage+ Audience
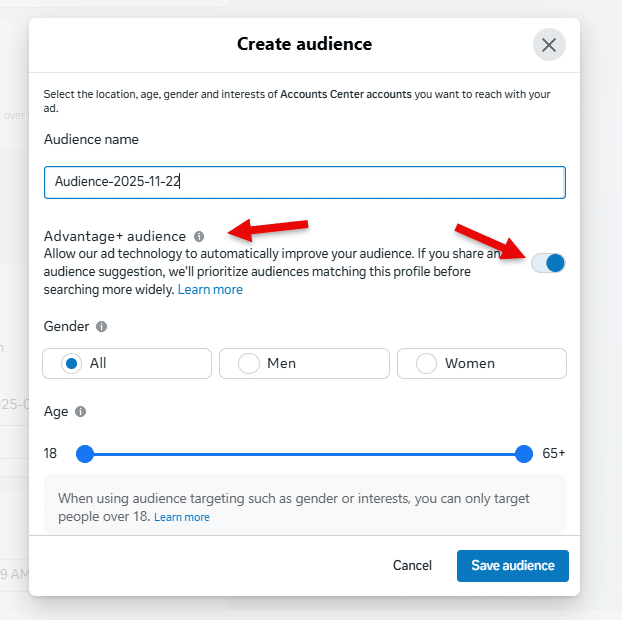
Here, you may see an option called Advantage+ Audience. This feature allows Meta to automatically widen your targeting beyond what you’ve selected. It’s designed for larger budgets and more advanced campaigns.
For Coffee-a-Day, this isn’t helpful. It adds randomness to who sees your post, which makes your results harder to understand and compare. We want your audience to stay simple and consistent so you can clearly see which posts are performing better.
So for now, keep Advantage+ Audience turned off and stick with the audience you just created.
Step 7C: Audience Setup: Choose Gender & Age
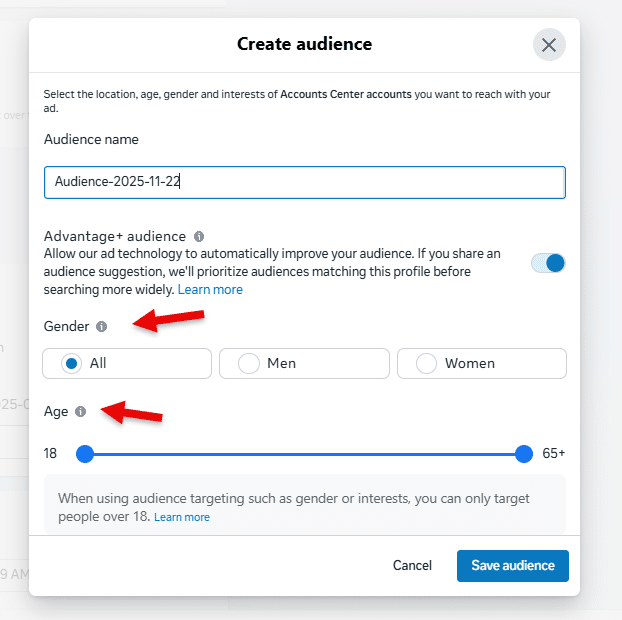
Next, you’ll choose the gender and age range for your audience.
For most businesses, it’s best to keep this simple. Choose all genders unless your service truly applies to only one group.
For age, pick a range that generally matches your customers. It doesn’t have to be perfect, so a broad range is completely fine for Coffee-a-Day testing.
At this stage, we’re not trying to get hyper-specific. We just want Meta to have enough room to find people who might be interested, without complicating your test. Keeping this part simple makes your results easier to understand and keeps the focus on the content itself.
One note to consider: In some of his tests for a client, Les found that when he included 65+, he got a LOT of people that were just clicking and never doing more, so unless your ideal audience really is 65+ it is worth considering setting the maximum age to 64 or lower.
Step 7D: Audience Setup: Choose Location(s)
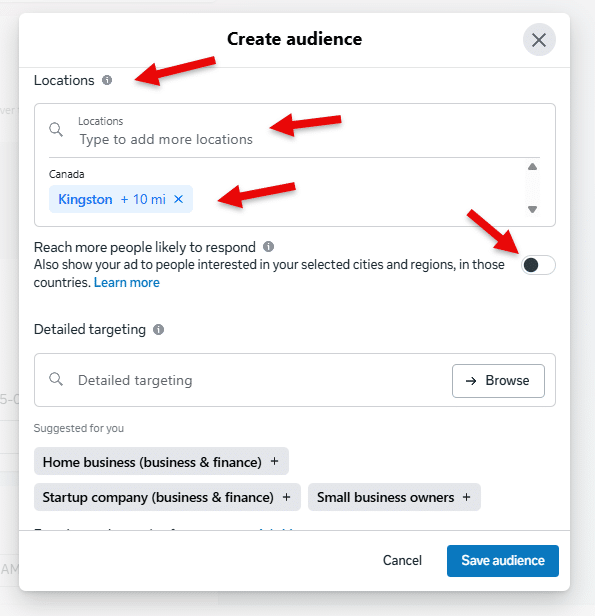
Depending on your screen layout, you may need to scroll down to reach the location settings. Meta sometimes tucks this section lower on the page, so don’t worry if you don’t see it right away.
Now let’s set your location. Choose the area where your real customers actually come from. If you’re a local business, enter your city or service area and adjust the radius to something reasonable for how far people actually travel to you or you travel to them. If your work is online or nationwide, you can choose your whole country. If you only serve one state or province, choose that instead.
You’ll see options to add a location or remove any defaults that Meta added automatically. Remove anything that doesn’t apply.
If you see a setting called “Reach more people likely to respond,” turn that off. It widens your targeting in ways that make Coffee-a-Day tests harder to compare.
Keep your location simple and realistic — we’ll use this same audience for all your tests.
Step 7E: Audience Setup: Detailed Targeting
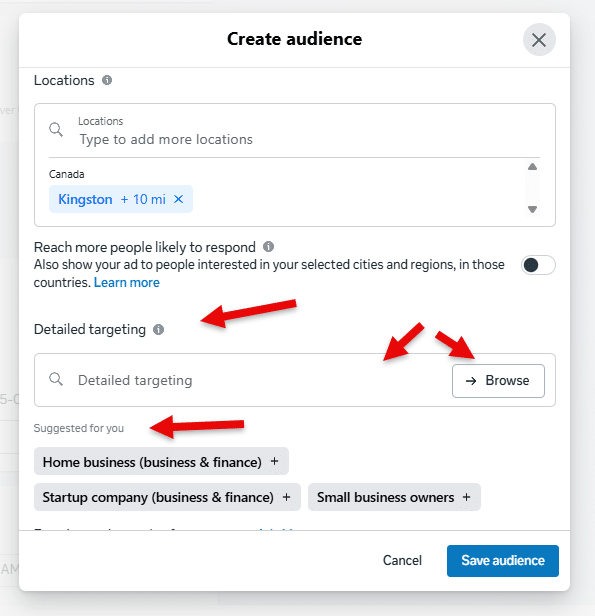
In this section, Meta gives you the option to tell it what kinds of things your audience is interested in. For example, “massage therapy,” “fitness,” “small business,” or whatever you think is relevant. You’ll see a search box, a “browse” option, and a list of suggested interests underneath.
For Coffee-a-Day, we keep this simple. You can leave this section completely blank. If you want to add something, for now choose only one interest, and only if it’s very obvious and directly related to your business.
Choosing interests used to be a very important part of setting up boosts. However, Meta has gotten very good at figuring out who your audience is from the content of your posts and what it knows about your business.
It’s also important to know that Meta’s interests can be misleading. Someone tagged as “interested in Massage Therapy,” for example, might have only liked a meme about massage or watched a short video about stretching. Meta puts people into these categories based on tiny signals, where even a single click or pause can count.
Because of this, detailed targeting often brings in people who aren’t actually a good fit. That’s why we recommend keeping this section minimal. At this stage, we’re testing the content, not complex audience layers.
Finally, these “interests” are much less accurate than they used to be, thanks in large part to Apple’s emphasis on privacy.
If you’re unsure what interests to specify here, it’s perfectly fine to leave detailed targeting blank.
Step 7F: Audience Setup: Save & Select Your Audience
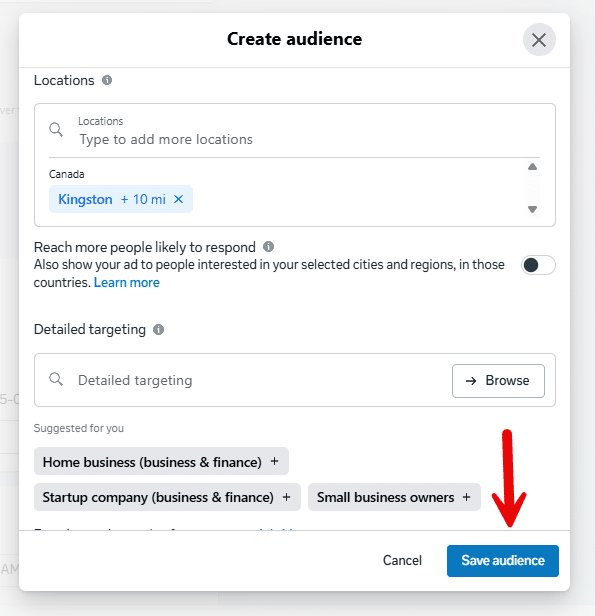
Once you’ve finished setting up your audience, click Save Audience. This saves the audience so you can use it for all your future Coffee-a-Day tests.
After saving, Meta doesn’t always select the new audience automatically. Take a moment to look at the audience list and make sure the one you just created is actually selected. If it isn’t, simply click on it to choose it. This step ensures your test uses the correct audience — and keeps your results consistent across all your Coffee-a-Day boosts.
Step 8: Choose Schedule & Budget
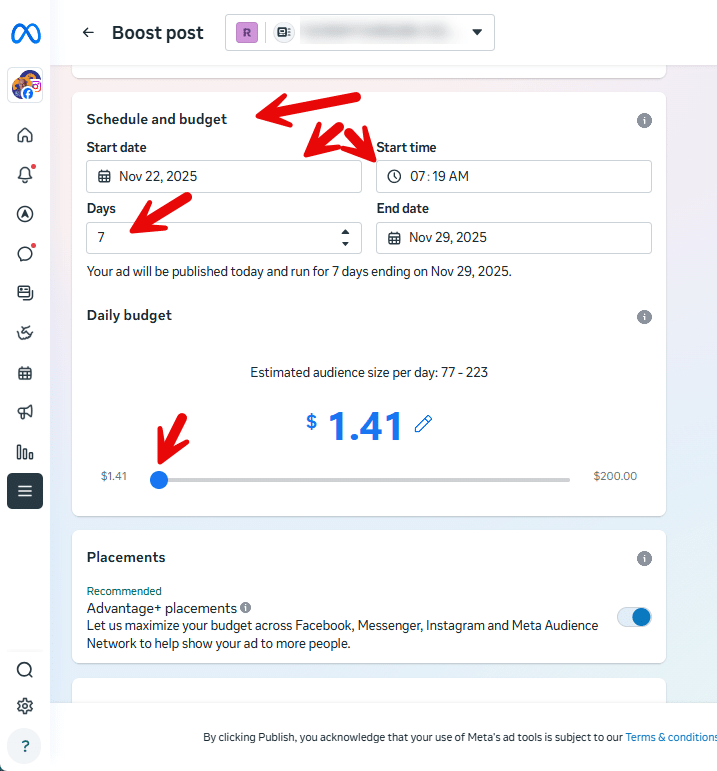
Let’s set your schedule and budget.
First, choose a start time, preferably first thing in the morning. This gives Meta the full day to spread out your budget naturally. If you start a boost later in the day, Meta will try to cram the remaining day’s budget into just a few hours, which can make your results look strange or uneven.
If it’s already later in the day, simply set the boost to start first thing the following morning instead.
Next, choose 7 days for the duration. This gives Meta more time to learn and show your post to different groups of people. It also helps you learn if certain days of the week bring better or different results.
Before you set the actual budget amount, remember what we said earlier: Coffee-a-Day is the method, not the exact price. Every platform and country has its own minimum. So if you see something higher than $1, that’s completely normal.
Just set the lowest amount Meta allows. That’s usually around $1 USD or $1.41 CAD. And it may be higher, even a lot higher, depending on the Goal you chose earlier.
Step 9: Choose Placements

Next, you’ll choose where your boosted post will appear. Meta calls these “placements,” and that simply means the different places your ad could show up, such as Facebook, Instagram, or Messenger.
For Coffee-a-Day, keep this step very simple. Turn off Automatic Placements so Meta doesn’t spread your small budget across lots of different places. We want the results to be easy to understand.
Then choose only the platform where the post was originally created. If it’s a Facebook post, select the Facebook placements. If it’s an Instagram post, choose the Instagram placements.
Keeping placements limited to one platform helps you get cleaner, clearer results from your test.
Step 10: Choose Payment Method
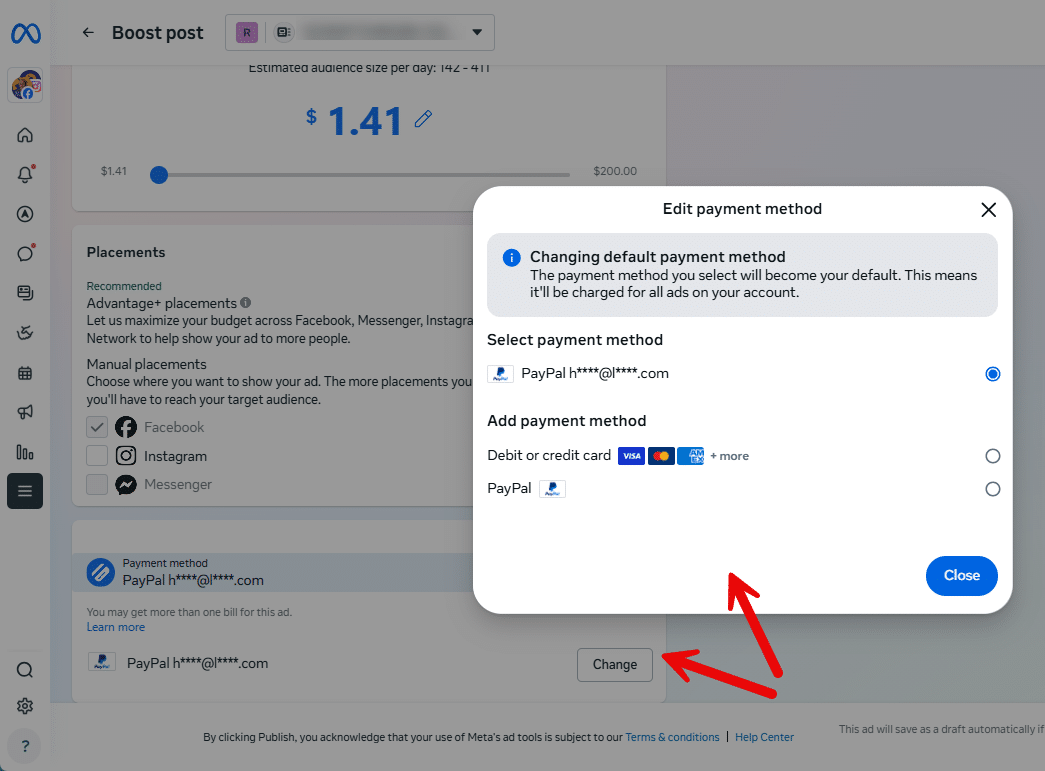
At this stage, Meta may ask you to choose or add a payment method. If this is your first time boosting, this is completely normal, as Meta often waits until the boost setup before asking for billing details.
If you don’t already have a payment method added, you can add a credit card or PayPal. Meta only needs this once, and you won’t need to re-enter it for future boosts.
Pro tip: add a second payment method as a backup in case there is an issue with the primary one.
If you see multiple payment methods listed, take a moment to make sure the one you want to use is actually selected. Meta doesn’t always choose the right one automatically.
If anything here looks different or confusing, that’s normal too as this screen varies by country and account.
Step 11: Review & Publish
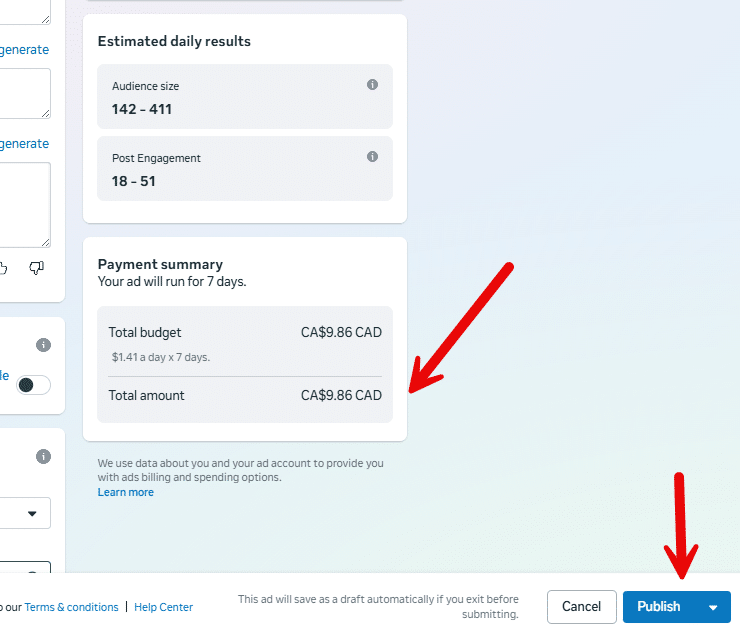
Now let’s do a quick final check before your boost goes live.
Look over all of your settings one more time: your goal, audience, placements, schedule, and anything else you’ve chosen along the way.
Make sure your budget is set to the lowest amount Meta allows, and confirm that the correct payment method is selected if you have more than one.
Once everything looks right, go ahead and click Boost or Publish, depending on what your screen shows.
Step 12: Ad In Review
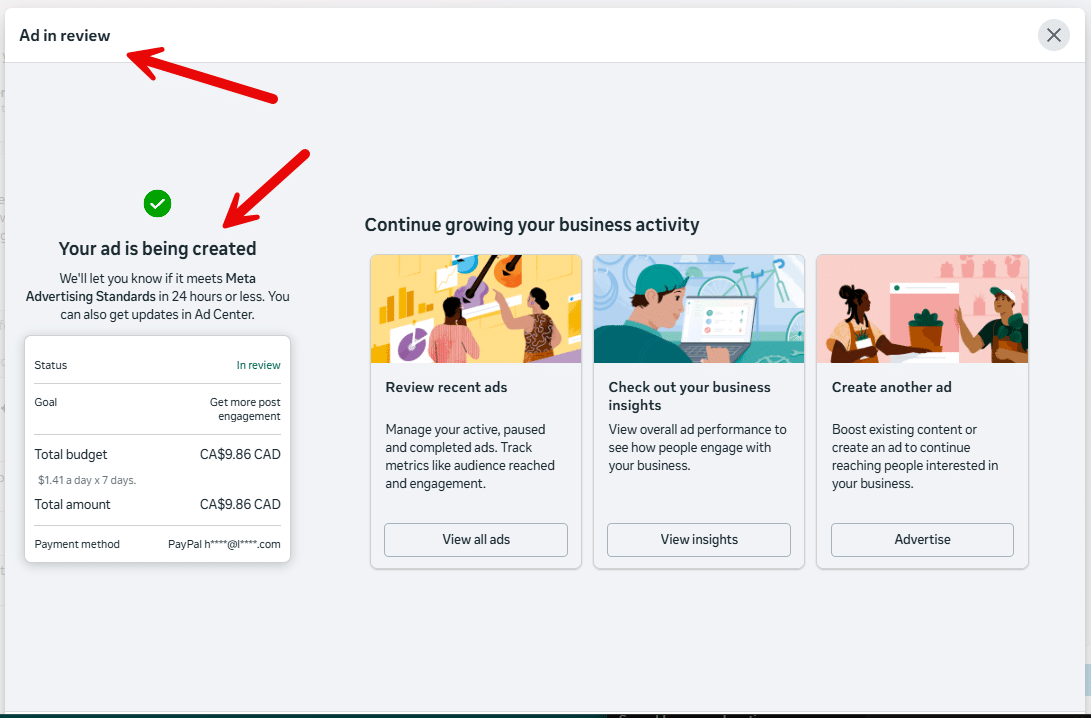
After you click Boost or Publish, Meta will show a popup confirming that your ad is now in review. This is completely normal, as every boost goes through this quick review process.
On the right side of this popup, Meta may display suggestions, offers, or extra options. You can ignore all of that.
You don’t need to stay on this screen. You can safely close the popup. The ad review continues in the background, and your boost status will update automatically once it’s approved.
You’re In! Now You Can Finally Work the Room
The Coffee-a-Day approach is about moving from guessing to knowing. By poosting posts, you have tipped the bouncer and walked past the velvet rope. Now you are finally in the room with the people who matter. You are not just shouting at a closed door anymore. You are standing in the middle of the party, seeing if your message actually catches anyone’s eye.
The hardest part of this whole boosting process? Doing nothing for seven days. Don’t check it every hour. The results aren’t realtime, and they can fluctuate so that sometimes it looks like the post is doing great, then notsomuch and vice versa. At the end of the week, you will have real data. You will see how your audience responded to your post, and use this to guide your next posts.
You are no longer desperately chasing attention. You have built a system that tests what works. Once you find a post that resonates, you can give it more fuel and let it work for you around the clock.
This is just one piece of the puzzle. The full Coffee-a-Day system goes much deeper to help you:
- Learn about the signals you get from your posts.
- The specific types of stories and posts that not only get people to stop scrolling, but to start engaging.
- The roadmap for turning simple engagement into real leads and sales.
- How to build a “Greatest Hits” library that works while you sleep so you can finally get off the social media hamster wheel of posting daily.
Come check out the full Coffee-a-Day online course, which includes access to my AI marketing assistant.
👉 Click here to learn about the Coffee-a-Day social media online course
